Sure! Here’s a paraphrased and unique version of the article with the keyword “step by step” included:
How to Draw a Crocus Flower for Spring
Are you looking to draw a crocus flower for the spring season?
In this step by step guide, I will walk you through an easy method to draw purple crocuses using just a few markers. Let’s get started!
Art Materials Needed for This Drawing
For this simple crocus drawing, I used the following markers from Ohuhu Honolulu:
- Viola (V230)
- Light Lavender (V250)
- Lavender (V270)
- Melon Yellow (YR33)
- Marigold (YR2)
- Sugarcane (GY7)
- Yellow Green (GY4)
- Absinthe (GY5)
You can get these markers individually or as a set.
Additionally, I used two Derwent Chromaflow colored pencils:
- White 2400
- Raisin 2000 (an orange-brown color)
The drawing was done on Canson Illustration Manga Paper.
How to Draw Crocus Flowers – A Simple Approach
For this particular drawing, I decided to skip the initial sketch and dive straight into using markers. This approach helped me create a quicker and more straightforward crocus flower design.
Step 1: Mark the Center of the Crocus Flowers
To begin, I marked the centers of the four crocus flowers I wanted to draw. I arranged the centers in a diamond shape just slightly above the middle of the paper. Then, I used Melon Yellow (YR33) to color the centers, giving them a soft orange-yellow hue, which also represents the flower’s stamens
.
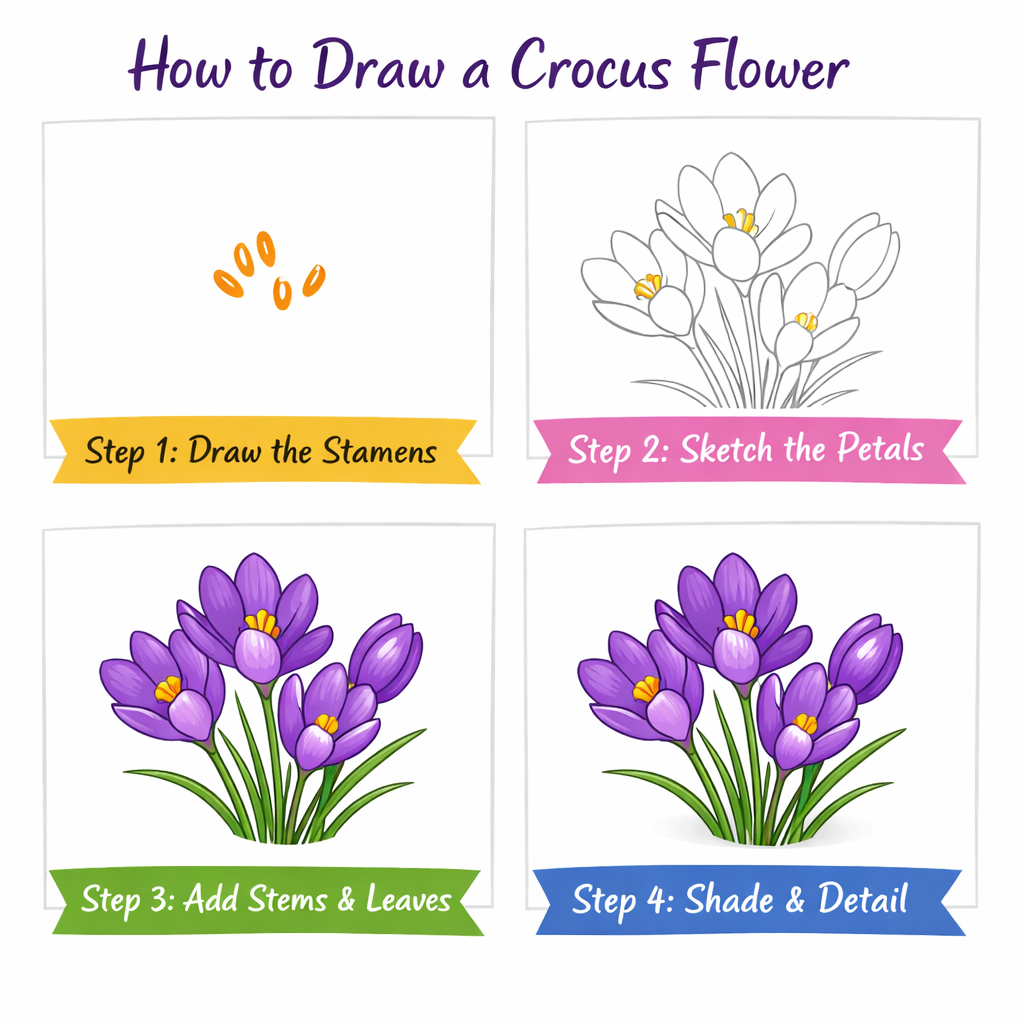
Step 2: Add Petals Around the Stamens
Next, I began to add the petals around the stamens. Using brush markers, I started at the top of each petal, creating a rounded top and a pointy bottom. The first two petals of the bottom flower formed a heart shape, and I colored them with the Viola (V230) marker.
Following that, I completed the remaining petals of this flower with the same technique. After finishing the first flower, I moved on to add the petals to the other flowers. I also drew two flower buds—one small on the right and a larger one on the left that’s about to bloom.
How To Draw A Sunset – Easy Step-By-Step Tutorial click here
Step 3: Add Shading to the Petals with Darker Purple Tones
To add dimension and depth to the flowers, I introduced some shading. First, I used Light Lavender (V250) to add some shading to the front petals and the top edge of the petals further back. To blend the shading, I went over the shaded areas with Viola (V230), creating a smooth transition.
For the darkest shading, I focused on the front petals and some of the back petals’ top edges to make them appear more three-dimensional.
Step 4: Add the Stems and Greenery
To keep the crocuses grounded, I added stems connecting the flowers to the bottom of the paper. I used Sugarcane (GY7), a light green marker, to color the stems, and also included long green leaves and grass-like lines to add more greenery.
For added interest, I placed light green dots around the foliage. Additionally, I shaded the right side of the stamens with Marigold (YR2), giving the flowers more depth.
Step 5: Add Details and Highlights to the Drawing
Now that the drawing looks good, I decided to enhance it with a few final details. Using my Derwent Chromaflow pencils, I added some subtle shading to the right side of the stamens with Raisin 2000. I also used White 2400 to add a few highlights on the petals, creating fine white lines that ran along their length.
These small touches brought a bit more life and dynamic quality to the drawing.
Conclusion
And there you have it, a simple step by step guide to drawing beautiful crocus flowers. I hope this tutorial helped you create your own stunning crocus drawing this spring!